A Fresnel Lens Solar Grill
by Bruce Joseph
(Tucson, AZ USA)

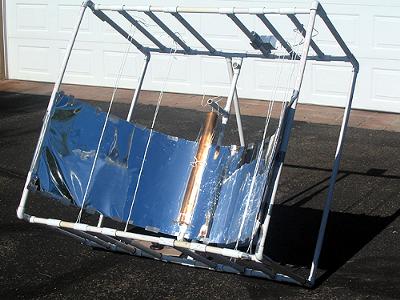
Parabollic Trough boiling Water
My introduction to solar cooking began about two years ago, with the goal of boiling water to make my morning coffee. I started off with a home made parabolic trough built of PVC pipe, aluminum flashing and Mylar (below). While the design worked, bringing a quart of water to a boil in about 20 minutes, it was fairly awkward to use, and I began looking for a better solution.
Boiling a quart of water in a large copper pipe.
That led to me buying a 30” x 40” linear Fresnel lens that I found on the internet. I built a frame for the lens using 2” x 2” lumber and hardware from Home Depot, and holding my container on a modified camera tripod (below). This design also worked well, and I discovered that I could cook food with the Fresnel as well. I set a cast iron skillet on my tripod and was able to use the cooker as a grill.
There’s a burger cooking on tripod in background.
The cooker, now dubbed my “solar grill” gets very hot, and heats from above. Because of this, I learned that preheating the skillet (with the sun) adding my food then setting a bacon press on top of the food produced very good results.
Using this technique, I can cook a burger or make a toasty grilled cheese sandwich in less than six minutes. I’ve also cooked eggs, sausage, fish, chicken breasts and even a beef tenderloin on the grill. The thick, ¾ lb. tenderloin, seasoned with only salt, pepper and garlic powder, cooked to a beautiful medium rare in about 15 minutes.
While this design cooked food well, it wasn’t all that easy to use. The tripod with the skillet was top heavy and difficult to adjust, and it was easy to step into the focal line, and thus get burned. The Fresnel lens is very hot and bright along its focal line. I always wear eye protection (sun glasses or welding goggles) and use hot pads and cooking mitts when cooking with it.
I have redesigned the grill several times, keeping the cooking technique the same, but making the grill itself safer and easier to use and transport. My current design (below) is a wheeled table with the Fresnel lens mounted on two pivoting arms. The arms are set at the focal point of the lens (about 32”) and the cooking surface is always at the focal line. I have an alignment tool that I use to aim the cooker at the sun, and I adjust the angle of the lens with an adjustable curtain rod. The table is constructed of 2” x 4” pressure treated lumber, and the arms which hold the lens are 1” x 3.” Aside from the lens, all of the parts came from Home Depot, and the cost was minimal. The table was assembled with wood screws and a few nuts, bolts and washers, and required little more than a table saw and a cordless drill/driver to build.
Notice the wheels, the alignment tool on arm, the curtain rod vertical adjuster and the cooking platform at the rear. The shade is used to cover the lens when not in use.
Here in Tucson, there are several solar events each year. I take the grill to as many as possible, so I specifically designed it to fit into the back of my Jetta station wagon.
The lens, which I store covered in my garage when not it use, comes off of its arms and locks on the top of the grill table for transport. The table has wheels so that I can roll it, and the curtain rod screws into place, allowing me to easily move the entire grill to its setup location. Setup is very easy, using just a few wing nuts, turning the table toward the sun, and adjusting the curtain rod.
While most cooks at solar events use slow cooking box ovens, the Fresnel grill allows spectators to witness the sun’s power very quickly. It has the ability to set a 1” x 3” on fire in about 5 seconds, so it’s a real attention getter at them. In addition to fire in seconds, the grill’s ability to cook delicious food in just a few minutes, and produce an 800+ F degree temperature reading on the skillet - using an infrared thermometer - impresses both children and adults.
For optimal solar tracking, the table needs to be re-aligned about once every once every 15 minutes, but since most food I prepare cooks in under ten minutes, this isn’t much of an issue. The alignment tool makes this process very accurate and easy.
In addition to solar events, I also cook with the solar grill at my home. I work from my house. It takes just a few minutes to set up, and I often use it to make a quick burger or grilled cheese sandwich for my lunch, or for a friend or two. Because of the way the grill is designed, it’s hasn’t proved useful for my initial goal of rapidly boiling a quart of water. I’m still working on that, and also trying to figure out a practical method of steaming vegetables.
Bruce Joseph
Tucson, AZ
_____________________________________________
Thank you very much Bruce.
Very detailed and very "enlightening"
Nathan
Admin.
Comments for A Fresnel Lens Solar Grill
|
||
|
||
|
||
|
||
|
||
|
||
SOLAR COOKER CATEGORIES
Panel Cookers
Box Cookers
Parabolic Cooker
Evacuated Cookers
Accessories
Discontinued CookersNew Financing Options available for purchase of Solar Cookers


